Getmac
Getmac
Returns the media access control and list of network protocols associated with each for all network cards in each computer, either locally or across a network.
Syntax
getmac[.exe] [/s Computer [/u Domain\User [/p Password]]] [/fo {TABLE|LIST|CSV}] [/nh] [/v]
Parameters
/s Computer
Specifies the name or IP of a remote computer (do not use backslashes). The default is the local computer.
/u Domain\User
Runs the command with the account permissions of the user specified by User or Domain\User. The default is the permissions of the current logged on user on the computer issuing the command.
/p Password
Specifies the password of the user account that is specified in the /u parameter.
/fo {TABLE|LIST|CSV}
Specifies the format to use for the query output. Valid values are TABLE, LIST, and CSV. The default format for output is TABLE.
/nh
Suppresses column header in output. Valid when the /fo parameter is set to TABLE or CSV.
/v
Specifies that the output display verbose information.
/?
Displays help at the command prompt.
Remarks
• Getmac can be useful either when you want to enter the MAC address into a network analyzer or when you need to know what protocols are currently in use on each network adapter in a computer.
Examples
The following examples show how you can use the getmac command:
getmac /fo table /nh /v
getmac /s srvmain
getmac /s srvmain /u maindom\hiropln
getmac /s srvmain /u maindom\hiropln /p p@ssW23
getmac /s srvmain /u maindom\hiropln /p p@ssW23 /fo list /v
getmac /s srvmain /u maindom\hiropln /p p@ssW23 /fo table /nh
Formatting legend
Format Meaning
Italic Information that the user must supply
Bold Elements that the user must type exactly as shown
Ellipsis (...) Parameter that can be repeated several times in a command line
Between brackets ([]) Optional items
Between braces ({}); choices separated by pipe (|). Example: {even|odd} Set of choices from which the user must choose only one
Courier font Code or program output
You can download my video , to how to change the MAC Address .
http://www.4shared.com/file/bS-oB1ui/HOW_TO_CHANGE_MAC_ADDRESS.html
CHANGE MAC ADDRESS
CHANGE MAC ADDRESS
CHANGE MAC ADDRESS-1
Method 1:
This is depending on the type of Network Interface Card (NIC) you have. If you have a card that doesn’t support Clone MAC address, then you have to go to second method.
a. Go to Start->Settings->Control Panel and double click on Network and Dial-up Connections.
b. Right click on the NIC you want to change the MAC address and click on properties.
c. Under “General” tab, click on the “Configure” button
d. Click on “Advanced” tab
e. Under “Property section”, you should see an item called “Network Address” or "Locally Administered Address", click on it.
f. On the right side, under “Value”, type in the New MAC address you want to assign to your NIC. Usually this value is entered without the “-“ between the MAC address numbers.
g. Goto command prompt and type in “ipconfig /all” or “net config rdr” to verify the changes. If the changes are not materialized, then use the second method.
h. If successful, reboot your systems.
Method 2:
This method requires some knowledge on the Windows Registry. If you are not familiar with Windows Registry, just use the SMAC tool to change the MAC addresses, or consult with a technical person before you attempt on the following steps. Also, make sure you have a good backup of your registry.
a. Goto command prompt and type “ipconfig /all”, and
I. Record the Description for the NIC you want to change.
II. Record the Physical Address for the NIC you want to change. Physical Address is the MAC Address
b. Goto command prompt and type “net config rdr”,
c. Remember the number between the long number (GUID) inside the { }. For example, in the above “net config rdr” output, for MAC address “00C095ECB793,” you should remember {1C9324AD-ADB7-4920-B02D-AB281838637A}. You can copy and paste it to the Notepad, that’s probably the easiest way. (See figure 2.)
d. Go to Start -> Run, type “regedt32” to start registry editor. Do not use “Regedit.”
e. Do a BACKUP of your registry in case you screw up the following steps. To do this
I. Click on “HKEY_LOCAL_MACHINE on Local Machine” sub-window
II. Click on the root key “HKEY_LOCAL_MACHINE”.
III. Click on the drop-down menu “Registry -> Save Subtree As” and save the backup registry in to a file. Keep this file in a safe place.
f. Go to “HKEY_LOCAL_MACHINE\SYSTEM\CurrentControlSet\Control\Class\{4D36E972-E325-11CE-BFC1-08002BE10318}. Double click on it to expand the tree. The subkeys are 4-digit numbers, which represent particular network adapters. You should see it starts with 0000, then 0001, 0002, 0003 and so on.
g. Go through each subkey that starts with 0000. Click on 0000, check DriverDesc keyword on the right to see if that's the NIC you want to change the MAC address. The DriveDesc should match the Description you recorded from step (a.-I.). If you are not 100% sure about the DriverDesc, then you can verify by checking if the NetCfgInstanceID keyword value matches the GUID from step (c).
If there is no match, then move on to 0001, 0002, 0003, and so on, until you find the one you want. Usually 0000 contains the first NIC you installed on the computer.
In this demonstration, 0000 is the NIC I selected. (See figure 3.)
h. Once you selected the subkey (i.e. 0000), check if there is a keyword "NetworkAddress" exist in the right side of the window. (See figure 3.)
I. If "NetworkAddress" keyword does not exist, then create this new keyword:
i. Click on the drop down menu “Edit -> Add Value”.
ii. In the Add Value window, enter the following value then click OK. (See figure 4.)
Value Name: = NetworkAddress
Data Type: = REG_SZ
iii. String Editor window will pop up at this time (see figure 5.)
iv. Enter the new MAC address you want to modify. Then click OK.
(There should not be any "-" in this address. Your entry should only consist of 12 digits as seen in the figure 5.)
II. If "NetworkAddress" keyword exists, make sure it shows the keyword type is REG_SZ, and it should show as NetworkAddress:REG_SZ: . This keyword might not have a value at this time.
i. Double click on the keyword NetworkAddress and the String Editor window will pop up. (See Figure 5.)
ii. Enter the new MAC address you want to modify. Then click OK.
(There should not be any "-" in this address. Your entry should only consist of 12 digits as seen in the figure 5.)
j. There are 2 ways to make the new MAC address active. Method I does not require a system reboot:
I. Goto Start->Setting->Control Panel, and double click on "Network Neighborhood".
WARNING: Make sure you understand that you WILL lose the network connection after completing step "ii." below, and
if you have a DHCP client, you will get a new IP address after completing step "iii."
i. Select the Network Adaptor you just changed the MAC address.
ii. Right click on the selected Network Adaptor and click "Disable."
Verify the status column for this adaptor changes to "Disabled"
iii. Right click on the selected Network Adaptor and click "Enable."
Verify the status column for this adaptor changes to "Enabled"
iv. If for any reason it cannot be disabled or re-enabled, you have to
reboot your system to make the changes effective.
II. Reboot your Windows system.
k. Once completing step j (if rebooting the system, wait until the reboot is completed), go to command prompt, type “ipconfig /all” to confirm the new MAC address.
Restore The TRUE Hardware burned-in MAC Address:
a. Remove the entry you added:
I. If you followed Method 1, then go back to the advanced properties window and remove the entry you add.
II. If you followed Method 2, then remove the "NetworkAddress" keyword you added in the registry.
b. Use step (j) above to activate the change you make.
c. Once rebooted, go to command prompt, type “ipconfig /all” to confirm the original MAC address.
If MAC Address changes does not work:
If for whatever reason the MAC address cannot be changed using method 2, make sure you restore the registry setting by following the "Restore The TRUE Hardware burned-in MAC Address" instruction above. If necessary, restore the registry you just backed-up to get your system back to the original state. You can do this by clicking on the drop-down menu “Registry->Restore,” and restore your backup registry file.
The ID given is the MAC address.
The following code enumerates all LANA numbers, performs a reset (NCBREST), and an adapter status (NCBASTAT).
Sample Code
#include
#include
#include
#include
#include
typedef struct _ASTAT_
{
ADAPTER_STATUS adapt;
NAME_BUFFER NameBuff [30];
}ASTAT, * PASTAT;
ASTAT Adapter;
void main (void)
{
NCB Ncb;
UCHAR uRetCode;
char NetName[50];
LANA_ENUM lenum;
int i;
memset( &Ncb, 0, sizeof(Ncb) );
Ncb.ncb_command = NCBENUM;
Ncb.ncb_buffer = (UCHAR *)&lenum;
Ncb.ncb_length = sizeof(lenum);
uRetCode = Netbios( &Ncb );
printf( "The NCBENUM return code is: 0x%x \n", uRetCode );
for(i=0; i < lenum.length ;i++)
{
memset( &Ncb, 0, sizeof(Ncb) );
Ncb.ncb_command = NCBRESET;
Ncb.ncb_lana_num = lenum.lana[i];
uRetCode = Netbios( &Ncb );
printf( "The NCBRESET on LANA %d return code is: 0x%x \n",
lenum.lana[i], uRetCode );
memset( &Ncb, 0, sizeof (Ncb) );
Ncb.ncb_command = NCBASTAT;
Ncb.ncb_lana_num = lenum.lana[i];
strcpy( Ncb.ncb_callname, "* " );
Ncb.ncb_buffer = (char *) &Adapter;
Ncb.ncb_length = sizeof(Adapter);
uRetCode = Netbios( &Ncb );
printf( "The NCBASTAT on LANA %d return code is: 0x%x \n",
lenum.lana[i], uRetCode );
if ( uRetCode == 0 )
{
printf( "The Ethernet Number on LANA %d is:
%02x%02x%02x%02x%02x%02x\n",
lenum.lana[i],
Adapter.adapt.adapter_address[0],
Adapter.adapt.adapter_address[1],
Adapter.adapt.adapter_address[2],
Adapter.adapt.adapter_address[3],
Adapter.adapt.adapter_address[4],
Adapter.adapt.adapter_address[5] );
}
}
}
APPLIES TO
• Microsoft Platform Software Development Kit-January 2000 Edition, when used with:
o Microsoft Windows NT Advanced Server 3.1
o Microsoft Windows NT Server 3.5
o Microsoft Windows NT Server 3.51
o Microsoft Windows NT Server 4.0 Standard Edition
o Microsoft Windows NT Workstation 3.1
o Microsoft Windows NT Workstation 3.5
o Microsoft Windows NT Workstation 3.51
o Microsoft Windows NT Workstation 4.0 Developer Edition
o the operating system: Microsoft Windows 2000
o Microsoft Windows 98 Standard Edition
o Microsoft Windows 95
o Microsoft Windows 98 Standard Edition
Ack : Microsoft site .
Protocol Numbers
Protocol Numbers
* 0 HOPOPT IPv6 Hop-by-Hop Option
* 1 ICMP Internet Control Message
* 2 IGMP Internet Group Management
* 3 GGP Gateway-to-Gateway
* 4 IP IP in IP (encapsulation)
* 5 ST Stream
* 6 TCP Transmission Control
* 7 CBT CBT
* 8 EGP Exterior Gateway Protocol
* 9 IGP any private interior gateway (used by Cisco for their IGRP)
* 10 BBN-RCC-MON BBN RCC Monitoring
* 11 NVP-II Network Voice Protocol
* 12 PUP PUP
* 13 ARGUS ARGUS
* 14 EMCON EMCON
* 15 XNET Cross Net Debugger
* 16 CHAOS Chaos
* 17 UDP User Datagram
* 18 MUX Multiplexing
* 19 DCN-MEAS DCN Measurement Subsystems
* 20 HMP Host Monitoring
* 21 PRM Packet Radio Measurement
* 22 XNS-IDP XEROX NS IDP
* 23 TRUNK-1 Trunk-1
* 24 TRUNK-2 Trunk-2
* 25 LEAF-1 Leaf-1
* 26 LEAF-2 Leaf-2
* 27 RDP Reliable Data Protocol
* 28 IRTP Internet Reliable Transaction
* 29 ISO-TP4 ISO Transport Protocol Class 4
* 30 NETBLT Bulk Data Transfer Protocol
* 31 MFE-NSP MFE Network Services Protocol
* 32 MERIT-INP MERIT Internodal Protocol
* 33 SEP Sequential Exchange Protocol
* 34 3PC Third Party Connect Protocol
* 35 IDPR Inter-Domain Policy Routing Protocol
* 36 XTP XTP
* 37 DDP Datagram Delivery Protocol
* 38 IDPR-CMTP IDPR Control Message Transport Proto
* 39 TP++ TP++ Transport Protocol
* 40 IL IL Transport Protocol
* 41 IPv6 Ipv6
* 42 SDRP Source Demand Routing Protocol
* 43 IPv6-Route Routing Header for IPv6
* 44 IPv6-Frag Fragment Header for IPv6
* 45 IDRP Inter-Domain Routing Protocol
* 46 RSVP Reservation Protocol
* 47 GRE General Routing Encapsulation
* 48 MHRP Mobile Host Routing Protocol
* 49 BNA BNA
* 50 ESP Encapsulating Security Payload
* 51 AH Authentication Header
* 52 I-NLSP Integrated Net Layer Security TUBA
* 53 SWIPE IP with Encryption
* 54 NARP NBMA Address Resolution Protocol
* 55 MOBILE IP Mobility
* 56 TLSP Transport Layer Security Protocol using Kryptonet key management
* 57 SKIP SKIP
* 58 IPv6-ICMP ICMP for IPv6
* 59 IPv6-NoNxt No Next Header for IPv6
* 60 IPv6-Opts Destination Options for IPv6
* 61 any host internal protocol
* 62 CFTP CFTP
* 63 any local network
* 64 SAT-EXPAK SATNET and Backroom EXPAK
* 65 KRYPTOLAN Kryptolan
* 66 RVD MIT Remote Virtual Disk Protocol
* 67 IPPC Internet Pluribus Packet Core
* 68 any distributed file system
* 69 SAT-MON SATNET Monitoring
* 70 VISA VISA Protocol
* 71 IPCV Internet Packet Core Utility
* 72 CPNX Computer Protocol Network Executive
* 73 CPHB Computer Protocol Heart Beat
* 74 WSN Wang Span Network
* 75 PVP Packet Video Protocol
* 76 BR-SAT-MON Backroom SATNET Monitoring
* 77 SUN-ND SUN ND PROTOCOL-Temporary
* 78 WB-MON WIDEBAND Monitoring
* 79 WB-EXPAK WIDEBAND EXPAK
* 80 ISO-IP ISO Internet Protocol
* 81 VMTP VMTP
* 82 SECURE-VMTP SECURE-VMTP
* 83 VINES VINES
* 84 TTP TTP
* 85 NSFNET-IGP NSFNET-IGP
* 86 DGP Dissimilar Gateway Protocol
* 87 TCF TCF
* 88 EIGRP EIGRP
* 89 OSPFIGP OSPFIGP
* 90 Sprite-RPC Sprite RPC Protocol
* 91 LARP Locus Address Resolution Protocol
* 92 MTP Multicast Transport Protocol
* 93 AX.25 AX.25 Frames
* 94 IPIP IP-within-IP Encapsulation Protocol
* 95 MICP Mobile Internetworking Control Protocol
* 96 SCC-SP Semaphore Communications Sec. Protocol
* 97 ETHERIP Ethernet-within-IP Encapsulation
* 98 ENCAP Encapsulation Header
* 99 any private encryption scheme
* 100 GMTP GMTP
* 101 IFMP Ipsilon Flow Management Protocol
* 102 PNNI PNNI over IP
* 103 PIM Protocol Independent Multicast
* 104 ARIS ARIS
* 105 SCPS SCPS
* 106 QNX QNX
* 107 A/N Active Networks
* 108 IPComp IP Payload Compression Protocol
* 109 SNP Sitara Networks Protocol
* 110 Compaq-Peer Compaq Peer Protocol
* 111 IPX-in-IP IPX in IP
* 112 VRRP Virtual Router Redundancy Protocol
* 113 PGM PGM Reliable Transport Protocol
* 114 any 0-hop protocol
* 115 L2TP Layer Two Tunneling Protocol
* 116 DDX D-II Data Exchange (DDX)
* 117 IATP Interactive Agent Transfer Protocol
* 118 STP Schedule Transfer Protocol
* 119 SRP SpectraLink Radio Protocol
* 120 UTI UTI
* 121 SMP Simple Message Protocol
* 122 SM SM
* 123 PTP Performance Transparency Protocol
* 124 ISIS over IPv4
* 125 FIRE
* 126 CRTP Combat Radio Transport Protocol
* 127 CRUDP Combat Radio User Datagram
* 128 SSCOPMCE
* 129 IPLT
* 130 SPS Secure Packet Shield
* 131 PIPE Private IP Encapsulation within IP
* 132 SCTP Stream Control Transmission Protocol
* 133 FC Fibre Channel
* 134 RSVP-E2E-IGNORE
* 135-254 Unassigned
* 255 Reserved
RECOVERY CONSOLE :
How to install the Recovery Console
You can install the Recovery Console on your computer to make it available if you cannot restart Windows. To install the Recovery Console, you must be logged on as an administrator.
Although you can run the Recovery Console by starting directly from the Windows XP CD, it is generally more convenient to set it up as a start up option on your start up menu.
To install the Recovery Console, follow these steps:
1. Insert the Windows XP CD into the CD-ROM drive.
2. Click Start, and then click Run.
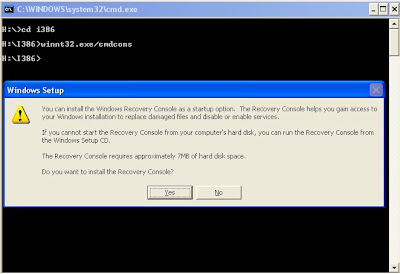
3. In the Open box, type d:\i386\winnt32.exe /cmdcons where d is the drive letter for the CD-ROM drive. In the case of 'Microsoft Windows XP Professional x64 Edition, type d:\amd64\winnt32.exe /cmdcons where d is the drive letter for the CD-ROM drive.
4. A Windows Setup Dialog Box appears. The Windows Setup Dialog Box describes the Recovery Console option. To confirm the installation, click Yes.
5. Restart the computer. The next time that you start your computer, "Microsoft Windows Recovery Console" appears on the startup menu.
Alternatively, you can use a Universal Naming Convention (UNC)-established connection to install the Recovery Console from a network share point.
Recovery Console rules
Several environment rules are in effect while you are working in the Recovery Console. Type set to see the current environment. By default, these are the rules:
• AllowAllPaths = FALSE prevents access to directories and subdirectories outside the system installation that you selected when you entered the Recovery Console.
• AllowRemovableMedia = FALSE prevents access to removable media as a target for copied files.
• AllowWildCards = FALSE prevents wildcard support for commands such as copy and del.
• NoCopyPrompt = FALSE means that you are prompted by the Recovery Console for confirmation when overwriting an existing file.
Alternatively you can download the Recovery console patch /software from these urls :
http://www.4shared.com/file/QF0GVQuD/recovery_console.html
http://www.4shared.com/file/yIK-5g8F/xp_recovery_console.html
OR THE VIDEO , HOW TO INSTALL THE RECOVERY CONSOLE :
http://www.4shared.com/file/QrC9STRm/rc_online.html
How to delete the Recovery Console
To delete the Recovery Console:
1. Go to My Computer, and then double-click the root drive where you installed the Recovery Console.
2. On the Tools menu, click Folder Options, and then click the View tab.
3. Click Show hidden files and folders, click to clear the Hide protected operating system files check box, and then click OK.
4. At the root folder, delete the Cmdcons folder and the Cmldr file.
5. At the root folder, right-click the Boot.ini file, and then click Properties.
6. Click to clear the Read-only check box, and then click OK.
Warning: Modifying the Boot.ini file incorrectly may prevent your computer from restarting. Make sure that you delete only the entry for the Recovery Console. Also, change the attribute for the Boot.ini file back to a read-only state after you finish this procedure. Open the Boot.ini file in Microsoft Windows Notepad, and remove the entry for the Recovery Console. It looks similar to this:
C:\cmdcons\bootsect.dat="Microsoft Windows Recovery Console" /cmdcons
How to install the Recovery Console
You can install the Recovery Console on your computer to make it available if you cannot restart Windows. To install the Recovery Console, you must be logged on as an administrator.
Although you can run the Recovery Console by starting directly from the Windows XP CD, it is generally more convenient to set it up as a start up option on your start up menu.
To install the Recovery Console, follow these steps:
1. Insert the Windows XP CD into the CD-ROM drive.
2. Click Start, and then click Run.
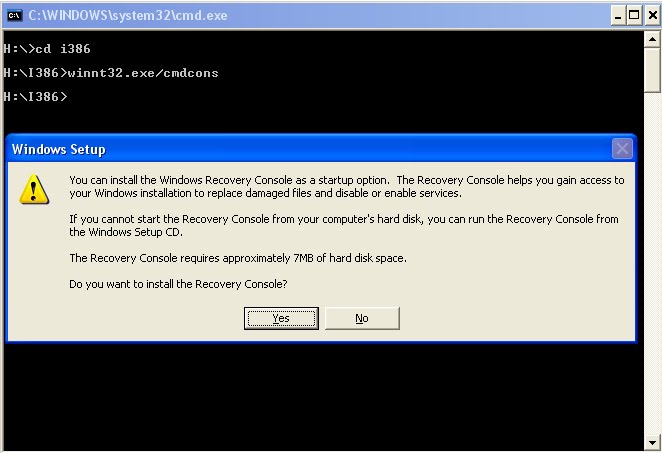
3. In the Open box, type d:\i386\winnt32.exe /cmdcons where d is the drive letter for the CD-ROM drive. In the case of 'Microsoft Windows XP Professional x64 Edition, type d:\amd64\winnt32.exe /cmdcons where d is the drive letter for the CD-ROM drive.
4. A Windows Setup Dialog Box appears. The Windows Setup Dialog Box describes the Recovery Console option. To confirm the installation, click Yes.
5. Restart the computer. The next time that you start your computer, "Microsoft Windows Recovery Console" appears on the startup menu.
Alternatively, you can use a Universal Naming Convention (UNC)-established connection to install the Recovery Console from a network share point.
Recovery Console rules
Several environment rules are in effect while you are working in the Recovery Console. Type set to see the current environment. By default, these are the rules:
• AllowAllPaths = FALSE prevents access to directories and subdirectories outside the system installation that you selected when you entered the Recovery Console.
• AllowRemovableMedia = FALSE prevents access to removable media as a target for copied files.
• AllowWildCards = FALSE prevents wildcard support for commands such as copy and del.
• NoCopyPrompt = FALSE means that you are prompted by the Recovery Console for confirmation when overwriting an existing file.
Alternatively you can download the Recovery console patch /software from these urls :
http://www.4shared.com/file/QF0GVQuD/recovery_console.html
http://www.4shared.com/file/yIK-5g8F/xp_recovery_console.html
OR THE VIDEO , HOW TO INSTALL THE RECOVERY CONSOLE :
http://www.4shared.com/file/QrC9STRm/rc_online.html
How to delete the Recovery Console
To delete the Recovery Console:
1. Go to My Computer, and then double-click the root drive where you installed the Recovery Console.
2. On the Tools menu, click Folder Options, and then click the View tab.
3. Click Show hidden files and folders, click to clear the Hide protected operating system files check box, and then click OK.
4. At the root folder, delete the Cmdcons folder and the Cmldr file.
5. At the root folder, right-click the Boot.ini file, and then click Properties.
6. Click to clear the Read-only check box, and then click OK.
Warning: Modifying the Boot.ini file incorrectly may prevent your computer from restarting. Make sure that you delete only the entry for the Recovery Console. Also, change the attribute for the Boot.ini file back to a read-only state after you finish this procedure. Open the Boot.ini file in Microsoft Windows Notepad, and remove the entry for the Recovery Console. It looks similar to this:
C:\cmdcons\bootsect.dat="Microsoft Windows Recovery Console" /cmdcons
http://passport.gov.in/ranchi.html : APPLY PASSPORT ONLINE
: YOU CAN TRANSFER BIG FILES ( G-MAIL ETC GIVES YOU 25 MB FILES ONLY TO SEND TO SOMEBODY , BUT IF YOU NEED MORE ,THEN VISIT THIS ONE ,IS USEFUL.
Email Large Files Quickly with Gmail and Box.net
Do you want to transfer some big files over the Internet using Gmail?
If the file is not an exe and less than 20 MB, you can send it as an email attachment in Gmail. Else upload the file to Rapidshare or YouSendIt and put the download link in your Gmail message.
That's a popular approach but you may also want to check the new Gmail OpenBox service from box.net.
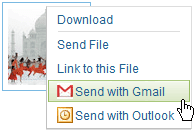
Using Gmail OpenBox, you can upload large files to Box.net and send them via Gmail with a simple right-click. Technically, the workflow is the same as sharing with RapidShare but this is more convenient and you have lot of options.
For instance, you may share individual files in your Gmail message or put multiple files in a folder and send a link to that folder. Your recipients will also get to view the contents of the file online using the built-in file viewers of Box.net. And you may unshare files anytime.
To use Gmail OpenBox, create a free account at box.net and then associate the Gmail service. You may use the same approach to share files via desktop email clients like Microsoft Outlook and Thunderbird.
Update: The free account imposes a limit of 10 MB per file but you may put multiple files under one folder in box.net and share the link of that folder via Gmail.
Numerous Ways to Send HUGE Files over Internet : :

http://www.cx.com/?gclid=CICz4tSTnawCFU0b6woddAt81Q
https://www.yousendit.com/
http://www.megaupload.com/
http://www.zupload.com/
http://www.dropsend.com/
http://www.mailbigfile.com/
http://www.leapfile.com/
http://www.mediamax.com/
http://www.box.net
http://www.orbitfiles.com
http://www.drivehq.com
http://www.mediafire.com
http://b2bfiles.net
http://www.tubesnow.com
http://www.transferbigfiles.com
http://fileho.com/
http://www.senduit.com
http://www.flipdrive.com
http://www.xdrive.com
http://mashable.com
http://www.pando.com/
http://www.civilnetizen.com/
Whether for personal or professional use, Viagra Online, Civil Netizen helps you with data transfer for files up to 4GB in size through a simple drag-and-drop interface
http://goaruna.com/
http://www.digg.com/software/Heavy-weight_file_emailing_solutions_reviewed
http://www.verzend.be
www.BoltFile.com
http://www.behance.net/mimimi
http://www.macscan.net/
www.Mozy.com
http://www.arunasend.com
http://divshare.com
http://www.lycos.com/
http://www.attachmore.com/
Skype is a good option too. Advantages:
- Free
- Sends directly to the user
- Secure
- Can handle any size of file
- Fast (if it doesn’t route through another skype user – see below)
- Multiplatform
Disadvantages:
- Can be slow (if it routers through another skype user. One user needs a direct net connection or port forwarding set up.)
- Both end users have to be online at once
- Can’t auto accept files
Other chat applications also allow file sending
http://bla.st/chat/
http://b2bfiles.net/home businesses and individual professionals.
http://www.wambo.com/
www.MailBigFile.com
http://sendalot.com
http://www.webcargo.net/en/
http://www.senduit.com
http://www.digitalfastball.com.
exfile.net.
http://pipebytes.com/
http://sendshack.com
http://www.filemail.com
=================================================>>>>>>>>>>>>>>>>>>>>>>>>>>>>
How to Send a File Attachment with Gmail
To attach a file or more to an email you send from Gmail:
• Click Attach a file while composing a message in Gmail. (If you do not see Attach a file, continue with clicking Browse or Choose File below.)
• If a file selection dialog pups up:
o Highlight all the files you want to send.
Use the Ctrl (Windows, Linux) or Command key to highlight multiple files.
Use the Shift key to highlight a range.
o Click Select.
• If you do not get an instant file selector:
o Click Browse... or Choose File.
o Locate the desired document and double-click it.
• Click Attach another file or Attach More Files to add another document to your email.
o Note that Gmail can send files up to 25 MB big. For larger files, or if the recipient's email service does not allow for files that big, you can use a file sending service instead.
Visit vocabulary
To add a file to a Gmail email message as an attachment using dragging and dropping:
• Start with a new message.
• Locate the file or files you want to upload in your file browser (Windows Explorer, e.g., or Finder).
• Click the file or files with the left mouse button and, keeping the button pressed, drag over the browser window with the email you are composing.
• Drag the file or files to the area that lights up with the message Drop files here.
o If you do not see such an area, your browser does not support drag-and-drop attachments. See above for attaching files in Gmail.
• Release the mouse button.
Remove a File from a Message You Are Sending
To cancel an attachment you have added to a message:
• Click remove next to the undesired file or
• make sure the box preceding it is not checked (if the file has already been uploaded).
: YOU CAN TRANSFER BIG FILES ( G-MAIL ETC GIVES YOU 25 MB FILES ONLY TO SEND TO SOMEBODY , BUT IF YOU NEED MORE ,THEN VISIT THIS ONE ,IS USEFUL.

Email Large Files Quickly with Gmail and Box.net
Do you want to transfer some big files over the Internet using Gmail?

If the file is not an exe and less than 20 MB, you can send it as an email attachment in Gmail. Else upload the file to Rapidshare or YouSendIt and put the download link in your Gmail message.
That's a popular approach but you may also want to check the new Gmail OpenBox service from box.net.
Using Gmail OpenBox, you can upload large files to Box.net and send them via Gmail with a simple right-click. Technically, the workflow is the same as sharing with RapidShare but this is more convenient and you have lot of options.
For instance, you may share individual files in your Gmail message or put multiple files in a folder and send a link to that folder. Your recipients will also get to view the contents of the file online using the built-in file viewers of Box.net. And you may unshare files anytime.
To use Gmail OpenBox, create a free account at box.net and then associate the Gmail service. You may use the same approach to share files via desktop email clients like Microsoft Outlook and Thunderbird.
Update: The free account imposes a limit of 10 MB per file but you may put multiple files under one folder in box.net and share the link of that folder via Gmail.
Numerous Ways to Send HUGE Files over Internet : :

http://www.cx.com/?gclid=CICz4tSTnawCFU0b6woddAt81Q
https://www.yousendit.com/
http://www.megaupload.com/
http://www.zupload.com/
http://www.dropsend.com/
http://www.mailbigfile.com/
http://www.leapfile.com/
http://www.mediamax.com/
http://www.box.net
http://www.orbitfiles.com
http://www.drivehq.com
http://www.mediafire.com
http://b2bfiles.net
http://www.tubesnow.com
http://www.transferbigfiles.com
http://fileho.com/
http://www.senduit.com
http://www.flipdrive.com
http://www.xdrive.com
http://mashable.com
http://www.pando.com/
http://www.civilnetizen.com/
Whether for personal or professional use, Viagra Online, Civil Netizen helps you with data transfer for files up to 4GB in size through a simple drag-and-drop interface
http://goaruna.com/
http://www.digg.com/software/Heavy-weight_file_emailing_solutions_reviewed
http://www.verzend.be
www.BoltFile.com
http://www.behance.net/mimimi
http://www.macscan.net/
www.Mozy.com
http://www.arunasend.com
http://divshare.com
http://www.lycos.com/
http://www.attachmore.com/
Skype is a good option too. Advantages:
- Free
- Sends directly to the user
- Secure
- Can handle any size of file
- Fast (if it doesn’t route through another skype user – see below)
- Multiplatform
Disadvantages:
- Can be slow (if it routers through another skype user. One user needs a direct net connection or port forwarding set up.)
- Both end users have to be online at once
- Can’t auto accept files
Other chat applications also allow file sending
http://bla.st/chat/
http://b2bfiles.net/home businesses and individual professionals.
http://www.wambo.com/
www.MailBigFile.com
http://sendalot.com
http://www.webcargo.net/en/
http://www.senduit.com
http://www.digitalfastball.com.
exfile.net.
http://pipebytes.com/
http://sendshack.com
http://www.filemail.com
=================================================>>>>>>>>>>>>>>>>>>>>>>>>>>>>
How to Send a File Attachment with Gmail
To attach a file or more to an email you send from Gmail:
• Click Attach a file while composing a message in Gmail. (If you do not see Attach a file, continue with clicking Browse or Choose File below.)
• If a file selection dialog pups up:
o Highlight all the files you want to send.
Use the Ctrl (Windows, Linux) or Command key to highlight multiple files.
Use the Shift key to highlight a range.
o Click Select.
• If you do not get an instant file selector:
o Click Browse... or Choose File.
o Locate the desired document and double-click it.
• Click Attach another file or Attach More Files to add another document to your email.
o Note that Gmail can send files up to 25 MB big. For larger files, or if the recipient's email service does not allow for files that big, you can use a file sending service instead.
Visit vocabulary
To add a file to a Gmail email message as an attachment using dragging and dropping:
• Start with a new message.
• Locate the file or files you want to upload in your file browser (Windows Explorer, e.g., or Finder).
• Click the file or files with the left mouse button and, keeping the button pressed, drag over the browser window with the email you are composing.
• Drag the file or files to the area that lights up with the message Drop files here.
o If you do not see such an area, your browser does not support drag-and-drop attachments. See above for attaching files in Gmail.
• Release the mouse button.
Remove a File from a Message You Are Sending
To cancel an attachment you have added to a message:
• Click remove next to the undesired file or
• make sure the box preceding it is not checked (if the file has already been uploaded).
CLSID_ControlPanel = "{21EC2020-3AEA-1069-A2DD-08002B30309D}"
CLSID_Printers = "{2227A280-3AEA-1069-A2DE-08002B30309D}"
CLSID_MyDocuments = "{450D8FBA-AD25-11D0-98A8-0800361B1103}"
CLSID_MyComputer = "{20D04FE0-3AEA-1069-A2D8-08002B30309D}"
CLSID_NetworkPlaces = "{208D2C60-3AEA-1069-A2D7-08002B30309D}"
CLSID_CompositeFolder = "{FEF10DED-355E-4e06-9381-9B24D7F7CC88}"
CLSID_RecycleBin = "{645FF040-5081-101B-9F08-00AA002F954E}"
CLSID_Briefcase = "{85BBD920-42A0-1069-A2E4-08002B30309D}"
CLSID_BriefcaseFolder = "{86747AC0-42A0-1069-A2E6-08002B30309D}"
CLSID_TaskScheduler = "{D6277990-4C6A-11CF-8D87-00AA0060F5BF}"
CLSID_RecycleBinCleaner = "{5ef4af3a-f726-11d0-b8a2-00c04fc309a4}"
CLSID_ShellViewerExt = "{84F26EA0-42A0-1069-A2E3-08002B30309D}"
CLSID_ShellDrvDefExt = "{5F5295E0-429F-1069-A2E2-08002B30309D}"
CLSID_ShellFSFolder = "{F3364BA0-65B9-11CE-A9BA-00AA004AE837}"
CLSID_ShellFileDefExt = "{21B22460-3AEA-1069-A2DC-08002B30309D}"
CLSID_FileTypes = "{B091E540-83E3-11CF-A713-0020AFD79762}"
CLSID_MIMEFileTypesHook = "{FBF23B41-E3F0-101B-8488-00AA003E56F8}"
CLSID_DocFindFolder = "{e17d4fc0-5564-11d1-83f2-00a0c90dc849}"
CLSID_ComputerFindFolder = "{1f4de370-d627-11d1-ba4f-00a0c91eedba}"
CLSID_DocFindCommand = "{B005E690-678D-11d1-B758-00A0C90564FE}"
CLSID_DocFindPersistHistory = "{bab33640-1280-11d2-aa30-00a0c91eedba}"
CLSID_DefViewPersistHistory = "{7febaf7c-18cf-11d2-993f-00a0c91f3880}"
CLSID_Internet = "{871C5380-42A0-1069-A2EA-08002B30309D}"
CLSID_ShellSearchExt = "{169A0691-8DF9-11d1-A1C4-00C04FD75D13}"
CLSID_ShellTreeWalker = "{95CE8412-7027-11D1-B879-006008059382}"
CLSID_DocObjColumnProvider = "{24F14F01-7B1C-11d1-838f-0000F80461CF}"
CLSID_URLColumnProvider = "{24F14F02-7B1C-11d1-838f-0000F80461CF}"
CLSID_FileSysColumnProvider = "{0D2E74C4-3C34-11d2-A27E-00C04FC30871}"
CLSID_VersionColProvider = "{66742402-F9B9-11D1-A202-0000F81FEDEE}"
CLSID_FileSearchBand = "{C4EE31F3-4768-11D2-BE5C-00A0C9A83DA1}"
CLSID_ShellNetDefExt = "{86422020-42A0-1069-A2E5-08002B30309D}"
CLSID_CFSIconOverlayManager = "{63B51F81-C868-11D0-999C-00C04FD655E1}"
CLSID_CopyToMenu = "{C2FBB630-2971-11d1-A18C-00C04FD75D13}"
CLSID_MoveToMenu = "{C2FBB631-2971-11d1-A18C-00C04FD75D13}"
CLSID_CWebViewMimeFilter = "{733AC4CB-F1A4-11d0-B951-00A0C90312E1}"
CLSID_DeskMovr = "{72267F6A-A6F9-11D0-BC94-00C04FB67863}"
CLSID_DeskHtmlProp = "{3FC0B520-68A9-11D0-8D77-00C04FD70822}"
CLSID_ActiveDesktop = "{75048700-EF1F-11D0-9888-006097DEACF9}"
CLSID_Shell = "{13709620-C279-11CE-A49E-444553540000}"
CLSID_WebViewFolderContents = "{1820FED0-473E-11D0-A96C-00C04FD705A2}"
CLSID_MigrationWizardAuto = "{67331D85-BE17-42f6-8D3F-47B8E8B26637}"
CLSID_ShellFolderView = "{62112AA1-EBE4-11cf-A5FB-0020AFE7292D}"
CLSID_ShellFolderViewOC = "{9BA05971-F6A8-11CF-A442-00A0C90A8F39}"
CLSID_Mshtml = "{25336920-03F9-11CF-8FD0-00AA00686F13}"
CLSID_ShellFldSetExt = "{6D5313C0-8C62-11D1-B2CD-006097DF8C11}"
CLSID_StartMenu = "{4622AD11-FF23-11d0-8D34-00A0C90F2719}"
CLSID_PersonalStartMenu = "{3F6953F0-5359-47FC-BD99-9F2CB95A62FD}"
CLSID_CmdFileIcon = "{57651662-CE3E-11D0-8D77-00C04FC99D61}"
CLSID_ShellDesktop = "{00021400-0000-0000-C000-000000000046}"
CLSID_SendToMenu = "{7BA4C740-9E81-11CF-99D3-00AA004AE837}"
CLSID_NewMenu = "{D969A300-E7FF-11d0-A93B-00A0C90F2719}"
CLSID_OpenWithMenu = "{09799AFB-AD67-11d1-ABCD-00C04FC30936}"
CLSID_OverlayIdentifier_SlowFile = "{7D688A77-C613-11D0-999B-00C04FD655E1}"
CLSID_WebFolders = "{BDEADF00-C265-11D0-BCED-00A0C90AB50F}"
CLSID_Shell32TypeLib = "{50a7e9b0-70ef-11d1-b75a-00a0c90564fe}"
CLSID_FolderShortcut = "{0AFACED1-E828-11D1-9187-B532F1E9575D}"
CLSID_MountedVolume = "{12518493-00B2-11d2-9FA5-9E3420524153}"
CLSID_MTAInjector = "{111DCCED-3B96-4170-A076-681669ED1512}"
CLSID_ShellLink = "{00021401-0000-0000-C000-000000000046}"
CLSID_NetworkConnections = "{7007ACC7-3202-11D1-AAD2-00805FC1270E}"
CLSID_FontsFolderShortcut = "{D20EA4E1-3957-11d2-A40B-0C5020524152}"
CLSID_AdminFolderShortcut = "{D20EA4E1-3957-11d2-A40B-0C5020524153}"
CLSID_DragDropHelper = "{4657278A-411B-11d2-839A-00C04FD918D0}"
CLSID_ExeDropTarget = "{86C86720-42A0-1069-A2E8-08002B30309D}"
CLSID_CShellMonikerHelper = "{679d9e37-f8f9-11d2-8deb-00c04f6837d5}"
CLSID_FolderOptions = "{6DFD7C5C-2451-11d3-A299-00C04F8EF6AF}"
CLSID_TaskbarOptions = "{0DF44EAA-FF21-4412-828E-260A8728E7F1}"
CLSID_FolderItem = "{FEF10FA2-355E-4e06-9381-9B24D7F7CC88}"
CLSID_FolderItemsFDF = "{53C74826-AB99-4d33-ACA4-3117F51D3788}"
CLSID_ShellNetCrawler = "{601ac3dc-786a-4eb0-bf40-ee3521e70bfb}"
DESC_ShellNetCrawler = "Network Crawler"
CLSID_WorkgroupCrawler = "{72b3882f-453a-4633-aac9-8c3dced62aff}"
DESC_WorkgroupCrawler = "Local Shares and Printers Crawler"
CLSID_HWShellExecute = "{FFB8655F-81B9-4fce-B89C-9A6BA76D13E7}"
CLSID_HWMixedContent = "{995C996E-D918-4a8c-A302-45719A6F4EA7}"
CLSID_AutoPlayVerb = "{f26a669a-bcbb-4e37-abf9-7325da15f931}"
CLSID_TimeCategorizer = "{3bb4118f-ddfd-4d30-a348-9fb5d6bf1afe}"
CLSID_SizeCategorizer = "{55d7b852-f6d1-42f2-aa75-8728a1b2d264}"
CLSID_FreeSpaceCategorizer = "{B5607793-24AC-44c7-82E2-831726AA6CB7}"
CLSID_DriveSizeCategorizer = "{94357B53-CA29-4b78-83AE-E8FE7409134F}"
CLSID_DriveTypeCategorizer = "{B0A8F3CF-4333-4bab-8873-1CCB1CADA48B}"
CLSID_MergedCategorizer = "{8e827c11-33e7-4bc1-b242-8cd9a1c2b304}"
CLSID_EncryptionContextMenuHandler ="{A470F8CF-A1E8-4f65-8335-227475AA5C46}"
DESC_EncryptionContextMenuHandler ="Encryption Context Menu"
CLSID_PropertiesUI = "{d912f8cf-0396-4915-884e-fb425d32943b}"
CLSID_ShellItem = "{9ac9fbe1-e0a2-4ad6-b4ee-e212013ea917}"
CLSID_LocalCopyHelper = "{021003e9-aac0-4975-979f-14b5d4e717f8}"
CLSID_ShellThumbnailDiskCache = "{1EBDCF80-A200-11d0-A3A4-00C04FD706EC}"
CLSID_Thumbnail = "{7487cd30-f71a-11d0-9ea7-00805f714772}"
CLSID_ISFBand = "{D82BE2B0-5764-11D0-A96E-00C04FD705A2}"
CLSID_MenuBand = "{5b4dae26-b807-11d0-9815-00c04fd91972}"
CLSID_QuickLinks = "{0E5CBF21-D15F-11d0-8301-00AA005B4383}"
CLSID_WebViewRegTreeItem = "{01E2E7C0-2343-407f-B947-7E132E791D3E}"
DESC_WebViewRegTreeItem = "WebView tree item callback object for sysdm.cpl"
CLSID_ThemesRegTreeItem = "{AABE54D4-6E88-4c46-A6B3-1DF790DD6E0D}"
DESC_ThemesRegTreeItem = "Themes tree item callback object for sysdm.cpl"
CLSID_StgFolder = "{E773F1AF-3A65-4866-857D-846FC9C4598A}"
DESC_StgFolder = "Shell Storage Folder Viewer"
INFOTIP_StgFolder = "A storage object for files"
CLSID_DynamicStorage = "{F46316E4-FB1B-46eb-AEDF-9520BFBB916A}"
DESC_DynamicStorage = "Dynamic Storage Object"
INFOTIP_DynamicStorage = "A storage object for collecting streams and storages"
CLSID_NamespaceWalker = "{72eb61e0-8672-4303-9175-f2e4c68b2e7c}"
CLSID_FolderViewHost = "{20b1cb23-6968-4eb9-b7d4-a66d00d07cee}"
CLSID_VirtualStorage = "{84720068-F106-4B58-A4C6-189382AB39BD}"
DESC_VirtualStorage = "Virtual Storage Object"
INFOTIP_VirtualStorage = "A storage object for collecting streams and storages"
CLSID_VirtualStorageEnum= "{E1618F52-BF15-484A-86D2-183400E66A2B}"
DESC_VirtualStorageEnum = "Virtual Storage Object Enumerator"
INFOTIP_VirtualStorageEnum = "A enumerator for the VirtualStorage class"
CLSID_StorageProcessor = "{6CF8E98C-5DD4-42A2-A948-BFE4CA1DC3EB}"
DESC_StorageProcessor = "Storage Processor Object"
INFOTIP_StorageProcessor= "An object that performs copies, moves, deletes, etc within IStorages"
CLSID_StgTransConfirmationUI = "{6B831E4F-A50D-45FC-842F-16CE27595359}"
DESC_StgTransConfirmationUI = "Storage Processor Default Confirmation UI"
INFOTIP_StgTransConfirmationUI= "An object that displays UI for errors and confirmations during copies, moves, deletes, etc. within IStorageProcessor"
CLSID_CDBurn = "{fbeb8a05-beee-4442-804e-409d6c4515e9}"
DESC_CDBurn = "ShellFolder for CD Burning"
CLSID_CDStagingFolder = "{00da2f99-f2a6-40c2-b770-a920f8e44abc}"
DESC_CDStagingFolder = "Staging ShellFolder for CD Burning"
CLSID_MergedFolder = "{26fdc864-be88-46e7-9235-032d8ea5162e}"
DESC_MergedFolder = "Merged Folder"
CLSID_CDBurnFolder = "{00eebf57-477d-4084-9921-7ab3c2c9459d}"
DESC_CDBurnFolder = "CD Burn Merged Folder"
CLSID_WMPExtension = "{f83cbf45-1c37-4ca1-a78a-28bcb91642ec}"
DESC_WMPExtension = "CD Burn WMP Hook"
CLSID_SharedDocuments = "{59031a47-3f72-44a7-89c5-5595fe6b30ee}"
DESC_SharedDocuments = "Shared Documents Folder"
CLSID_StartMenuFolder = "{48e7caab-b918-4e58-a94d-505519c795dc}"
DESC_StartMenuFolder = "Start Menu Folder"
CLSID_ProgramsFolder = "{7be9d83c-a729-4d97-b5a7-1b7313c39e0a}"
DESC_ProgramsFolder = "Programs Folder"
CLSID_FolderCustomize = "{ef43ecfe-2ab9-4632-bf21-58909dd177f0}"
DESC_FolderCustomize = "Folder Customization Tab"
CLSID_Printers = "{2227A280-3AEA-1069-A2DE-08002B30309D}"
CLSID_MyDocuments = "{450D8FBA-AD25-11D0-98A8-0800361B1103}"
CLSID_MyComputer = "{20D04FE0-3AEA-1069-A2D8-08002B30309D}"
CLSID_NetworkPlaces = "{208D2C60-3AEA-1069-A2D7-08002B30309D}"
CLSID_CompositeFolder = "{FEF10DED-355E-4e06-9381-9B24D7F7CC88}"
CLSID_RecycleBin = "{645FF040-5081-101B-9F08-00AA002F954E}"
CLSID_Briefcase = "{85BBD920-42A0-1069-A2E4-08002B30309D}"
CLSID_BriefcaseFolder = "{86747AC0-42A0-1069-A2E6-08002B30309D}"
CLSID_TaskScheduler = "{D6277990-4C6A-11CF-8D87-00AA0060F5BF}"
CLSID_RecycleBinCleaner = "{5ef4af3a-f726-11d0-b8a2-00c04fc309a4}"
CLSID_ShellViewerExt = "{84F26EA0-42A0-1069-A2E3-08002B30309D}"
CLSID_ShellDrvDefExt = "{5F5295E0-429F-1069-A2E2-08002B30309D}"
CLSID_ShellFSFolder = "{F3364BA0-65B9-11CE-A9BA-00AA004AE837}"
CLSID_ShellFileDefExt = "{21B22460-3AEA-1069-A2DC-08002B30309D}"
CLSID_FileTypes = "{B091E540-83E3-11CF-A713-0020AFD79762}"
CLSID_MIMEFileTypesHook = "{FBF23B41-E3F0-101B-8488-00AA003E56F8}"
CLSID_DocFindFolder = "{e17d4fc0-5564-11d1-83f2-00a0c90dc849}"
CLSID_ComputerFindFolder = "{1f4de370-d627-11d1-ba4f-00a0c91eedba}"
CLSID_DocFindCommand = "{B005E690-678D-11d1-B758-00A0C90564FE}"
CLSID_DocFindPersistHistory = "{bab33640-1280-11d2-aa30-00a0c91eedba}"
CLSID_DefViewPersistHistory = "{7febaf7c-18cf-11d2-993f-00a0c91f3880}"
CLSID_Internet = "{871C5380-42A0-1069-A2EA-08002B30309D}"
CLSID_ShellSearchExt = "{169A0691-8DF9-11d1-A1C4-00C04FD75D13}"
CLSID_ShellTreeWalker = "{95CE8412-7027-11D1-B879-006008059382}"
CLSID_DocObjColumnProvider = "{24F14F01-7B1C-11d1-838f-0000F80461CF}"
CLSID_URLColumnProvider = "{24F14F02-7B1C-11d1-838f-0000F80461CF}"
CLSID_FileSysColumnProvider = "{0D2E74C4-3C34-11d2-A27E-00C04FC30871}"
CLSID_VersionColProvider = "{66742402-F9B9-11D1-A202-0000F81FEDEE}"
CLSID_FileSearchBand = "{C4EE31F3-4768-11D2-BE5C-00A0C9A83DA1}"
CLSID_ShellNetDefExt = "{86422020-42A0-1069-A2E5-08002B30309D}"
CLSID_CFSIconOverlayManager = "{63B51F81-C868-11D0-999C-00C04FD655E1}"
CLSID_CopyToMenu = "{C2FBB630-2971-11d1-A18C-00C04FD75D13}"
CLSID_MoveToMenu = "{C2FBB631-2971-11d1-A18C-00C04FD75D13}"
CLSID_CWebViewMimeFilter = "{733AC4CB-F1A4-11d0-B951-00A0C90312E1}"
CLSID_DeskMovr = "{72267F6A-A6F9-11D0-BC94-00C04FB67863}"
CLSID_DeskHtmlProp = "{3FC0B520-68A9-11D0-8D77-00C04FD70822}"
CLSID_ActiveDesktop = "{75048700-EF1F-11D0-9888-006097DEACF9}"
CLSID_Shell = "{13709620-C279-11CE-A49E-444553540000}"
CLSID_WebViewFolderContents = "{1820FED0-473E-11D0-A96C-00C04FD705A2}"
CLSID_MigrationWizardAuto = "{67331D85-BE17-42f6-8D3F-47B8E8B26637}"
CLSID_ShellFolderView = "{62112AA1-EBE4-11cf-A5FB-0020AFE7292D}"
CLSID_ShellFolderViewOC = "{9BA05971-F6A8-11CF-A442-00A0C90A8F39}"
CLSID_Mshtml = "{25336920-03F9-11CF-8FD0-00AA00686F13}"
CLSID_ShellFldSetExt = "{6D5313C0-8C62-11D1-B2CD-006097DF8C11}"
CLSID_StartMenu = "{4622AD11-FF23-11d0-8D34-00A0C90F2719}"
CLSID_PersonalStartMenu = "{3F6953F0-5359-47FC-BD99-9F2CB95A62FD}"
CLSID_CmdFileIcon = "{57651662-CE3E-11D0-8D77-00C04FC99D61}"
CLSID_ShellDesktop = "{00021400-0000-0000-C000-000000000046}"
CLSID_SendToMenu = "{7BA4C740-9E81-11CF-99D3-00AA004AE837}"
CLSID_NewMenu = "{D969A300-E7FF-11d0-A93B-00A0C90F2719}"
CLSID_OpenWithMenu = "{09799AFB-AD67-11d1-ABCD-00C04FC30936}"
CLSID_OverlayIdentifier_SlowFile = "{7D688A77-C613-11D0-999B-00C04FD655E1}"
CLSID_WebFolders = "{BDEADF00-C265-11D0-BCED-00A0C90AB50F}"
CLSID_Shell32TypeLib = "{50a7e9b0-70ef-11d1-b75a-00a0c90564fe}"
CLSID_FolderShortcut = "{0AFACED1-E828-11D1-9187-B532F1E9575D}"
CLSID_MountedVolume = "{12518493-00B2-11d2-9FA5-9E3420524153}"
CLSID_MTAInjector = "{111DCCED-3B96-4170-A076-681669ED1512}"
CLSID_ShellLink = "{00021401-0000-0000-C000-000000000046}"
CLSID_NetworkConnections = "{7007ACC7-3202-11D1-AAD2-00805FC1270E}"
CLSID_FontsFolderShortcut = "{D20EA4E1-3957-11d2-A40B-0C5020524152}"
CLSID_AdminFolderShortcut = "{D20EA4E1-3957-11d2-A40B-0C5020524153}"
CLSID_DragDropHelper = "{4657278A-411B-11d2-839A-00C04FD918D0}"
CLSID_ExeDropTarget = "{86C86720-42A0-1069-A2E8-08002B30309D}"
CLSID_CShellMonikerHelper = "{679d9e37-f8f9-11d2-8deb-00c04f6837d5}"
CLSID_FolderOptions = "{6DFD7C5C-2451-11d3-A299-00C04F8EF6AF}"
CLSID_TaskbarOptions = "{0DF44EAA-FF21-4412-828E-260A8728E7F1}"
CLSID_FolderItem = "{FEF10FA2-355E-4e06-9381-9B24D7F7CC88}"
CLSID_FolderItemsFDF = "{53C74826-AB99-4d33-ACA4-3117F51D3788}"
CLSID_ShellNetCrawler = "{601ac3dc-786a-4eb0-bf40-ee3521e70bfb}"
DESC_ShellNetCrawler = "Network Crawler"
CLSID_WorkgroupCrawler = "{72b3882f-453a-4633-aac9-8c3dced62aff}"
DESC_WorkgroupCrawler = "Local Shares and Printers Crawler"
CLSID_HWShellExecute = "{FFB8655F-81B9-4fce-B89C-9A6BA76D13E7}"
CLSID_HWMixedContent = "{995C996E-D918-4a8c-A302-45719A6F4EA7}"
CLSID_AutoPlayVerb = "{f26a669a-bcbb-4e37-abf9-7325da15f931}"
CLSID_TimeCategorizer = "{3bb4118f-ddfd-4d30-a348-9fb5d6bf1afe}"
CLSID_SizeCategorizer = "{55d7b852-f6d1-42f2-aa75-8728a1b2d264}"
CLSID_FreeSpaceCategorizer = "{B5607793-24AC-44c7-82E2-831726AA6CB7}"
CLSID_DriveSizeCategorizer = "{94357B53-CA29-4b78-83AE-E8FE7409134F}"
CLSID_DriveTypeCategorizer = "{B0A8F3CF-4333-4bab-8873-1CCB1CADA48B}"
CLSID_MergedCategorizer = "{8e827c11-33e7-4bc1-b242-8cd9a1c2b304}"
CLSID_EncryptionContextMenuHandler ="{A470F8CF-A1E8-4f65-8335-227475AA5C46}"
DESC_EncryptionContextMenuHandler ="Encryption Context Menu"
CLSID_PropertiesUI = "{d912f8cf-0396-4915-884e-fb425d32943b}"
CLSID_ShellItem = "{9ac9fbe1-e0a2-4ad6-b4ee-e212013ea917}"
CLSID_LocalCopyHelper = "{021003e9-aac0-4975-979f-14b5d4e717f8}"
CLSID_ShellThumbnailDiskCache = "{1EBDCF80-A200-11d0-A3A4-00C04FD706EC}"
CLSID_Thumbnail = "{7487cd30-f71a-11d0-9ea7-00805f714772}"
CLSID_ISFBand = "{D82BE2B0-5764-11D0-A96E-00C04FD705A2}"
CLSID_MenuBand = "{5b4dae26-b807-11d0-9815-00c04fd91972}"
CLSID_QuickLinks = "{0E5CBF21-D15F-11d0-8301-00AA005B4383}"
CLSID_WebViewRegTreeItem = "{01E2E7C0-2343-407f-B947-7E132E791D3E}"
DESC_WebViewRegTreeItem = "WebView tree item callback object for sysdm.cpl"
CLSID_ThemesRegTreeItem = "{AABE54D4-6E88-4c46-A6B3-1DF790DD6E0D}"
DESC_ThemesRegTreeItem = "Themes tree item callback object for sysdm.cpl"
CLSID_StgFolder = "{E773F1AF-3A65-4866-857D-846FC9C4598A}"
DESC_StgFolder = "Shell Storage Folder Viewer"
INFOTIP_StgFolder = "A storage object for files"
CLSID_DynamicStorage = "{F46316E4-FB1B-46eb-AEDF-9520BFBB916A}"
DESC_DynamicStorage = "Dynamic Storage Object"
INFOTIP_DynamicStorage = "A storage object for collecting streams and storages"
CLSID_NamespaceWalker = "{72eb61e0-8672-4303-9175-f2e4c68b2e7c}"
CLSID_FolderViewHost = "{20b1cb23-6968-4eb9-b7d4-a66d00d07cee}"
CLSID_VirtualStorage = "{84720068-F106-4B58-A4C6-189382AB39BD}"
DESC_VirtualStorage = "Virtual Storage Object"
INFOTIP_VirtualStorage = "A storage object for collecting streams and storages"
CLSID_VirtualStorageEnum= "{E1618F52-BF15-484A-86D2-183400E66A2B}"
DESC_VirtualStorageEnum = "Virtual Storage Object Enumerator"
INFOTIP_VirtualStorageEnum = "A enumerator for the VirtualStorage class"
CLSID_StorageProcessor = "{6CF8E98C-5DD4-42A2-A948-BFE4CA1DC3EB}"
DESC_StorageProcessor = "Storage Processor Object"
INFOTIP_StorageProcessor= "An object that performs copies, moves, deletes, etc within IStorages"
CLSID_StgTransConfirmationUI = "{6B831E4F-A50D-45FC-842F-16CE27595359}"
DESC_StgTransConfirmationUI = "Storage Processor Default Confirmation UI"
INFOTIP_StgTransConfirmationUI= "An object that displays UI for errors and confirmations during copies, moves, deletes, etc. within IStorageProcessor"
CLSID_CDBurn = "{fbeb8a05-beee-4442-804e-409d6c4515e9}"
DESC_CDBurn = "ShellFolder for CD Burning"
CLSID_CDStagingFolder = "{00da2f99-f2a6-40c2-b770-a920f8e44abc}"
DESC_CDStagingFolder = "Staging ShellFolder for CD Burning"
CLSID_MergedFolder = "{26fdc864-be88-46e7-9235-032d8ea5162e}"
DESC_MergedFolder = "Merged Folder"
CLSID_CDBurnFolder = "{00eebf57-477d-4084-9921-7ab3c2c9459d}"
DESC_CDBurnFolder = "CD Burn Merged Folder"
CLSID_WMPExtension = "{f83cbf45-1c37-4ca1-a78a-28bcb91642ec}"
DESC_WMPExtension = "CD Burn WMP Hook"
CLSID_SharedDocuments = "{59031a47-3f72-44a7-89c5-5595fe6b30ee}"
DESC_SharedDocuments = "Shared Documents Folder"
CLSID_StartMenuFolder = "{48e7caab-b918-4e58-a94d-505519c795dc}"
DESC_StartMenuFolder = "Start Menu Folder"
CLSID_ProgramsFolder = "{7be9d83c-a729-4d97-b5a7-1b7313c39e0a}"
DESC_ProgramsFolder = "Programs Folder"
CLSID_FolderCustomize = "{ef43ecfe-2ab9-4632-bf21-58909dd177f0}"
DESC_FolderCustomize = "Folder Customization Tab"