RECOVERY CONSOLE :
How to install the Recovery Console
You can install the Recovery Console on your computer to make it available if you cannot restart Windows. To install the Recovery Console, you must be logged on as an administrator.
Although you can run the Recovery Console by starting directly from the Windows XP CD, it is generally more convenient to set it up as a start up option on your start up menu.
To install the Recovery Console, follow these steps:
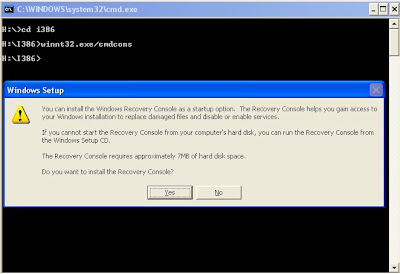
1. Insert the Windows XP CD into the CD-ROM drive.
2. Click Start, and then click Run.
3. In the Open box, type d:\i386\winnt32.exe /cmdcons where d is the drive letter for the CD-ROM drive. In the case of 'Microsoft Windows XP Professional x64 Edition, type d:\amd64\winnt32.exe /cmdcons where d is the drive letter for the CD-ROM drive.
4. A Windows Setup Dialog Box appears. The Windows Setup Dialog Box describes the Recovery Console option. To confirm the installation, click Yes.
5. Restart the computer. The next time that you start your computer, "Microsoft Windows Recovery Console" appears on the startup menu.
Alternatively, you can use a Universal Naming Convention (UNC)-established connection to install the Recovery Console from a network share point.
Recovery Console rules
Several environment rules are in effect while you are working in the Recovery Console. Type set to see the current environment. By default, these are the rules:
• AllowAllPaths = FALSE prevents access to directories and subdirectories outside the system installation that you selected when you entered the Recovery Console.
• AllowRemovableMedia = FALSE prevents access to removable media as a target for copied files.
• AllowWildCards = FALSE prevents wildcard support for commands such as copy and del.
• NoCopyPrompt = FALSE means that you are prompted by the Recovery Console for confirmation when overwriting an existing file.
Alternatively you can download the Recovery console patch /software from these urls :
http://www.4shared.com/file/QF0GVQuD/recovery_console.html
http://www.4shared.com/file/yIK-5g8F/xp_recovery_console.html
OR THE VIDEO , HOW TO INSTALL THE RECOVERY CONSOLE :
http://www.4shared.com/file/QrC9STRm/rc_online.html
How to delete the Recovery Console
To delete the Recovery Console:
1. Go to My Computer, and then double-click the root drive where you installed the Recovery Console.
2. On the Tools menu, click Folder Options, and then click the View tab.
3. Click Show hidden files and folders, click to clear the Hide protected operating system files check box, and then click OK.
4. At the root folder, delete the Cmdcons folder and the Cmldr file.
5. At the root folder, right-click the Boot.ini file, and then click Properties.
6. Click to clear the Read-only check box, and then click OK.
Warning: Modifying the Boot.ini file incorrectly may prevent your computer from restarting. Make sure that you delete only the entry for the Recovery Console. Also, change the attribute for the Boot.ini file back to a read-only state after you finish this procedure. Open the Boot.ini file in Microsoft Windows Notepad, and remove the entry for the Recovery Console. It looks similar to this:
C:\cmdcons\bootsect.dat="Microsoft Windows Recovery Console" /cmdcons
How to install the Recovery Console
You can install the Recovery Console on your computer to make it available if you cannot restart Windows. To install the Recovery Console, you must be logged on as an administrator.
Although you can run the Recovery Console by starting directly from the Windows XP CD, it is generally more convenient to set it up as a start up option on your start up menu.
To install the Recovery Console, follow these steps:
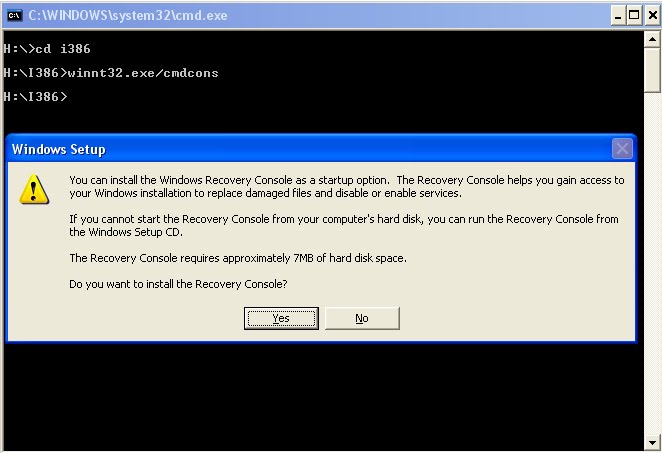
1. Insert the Windows XP CD into the CD-ROM drive.
2. Click Start, and then click Run.
3. In the Open box, type d:\i386\winnt32.exe /cmdcons where d is the drive letter for the CD-ROM drive. In the case of 'Microsoft Windows XP Professional x64 Edition, type d:\amd64\winnt32.exe /cmdcons where d is the drive letter for the CD-ROM drive.
4. A Windows Setup Dialog Box appears. The Windows Setup Dialog Box describes the Recovery Console option. To confirm the installation, click Yes.
5. Restart the computer. The next time that you start your computer, "Microsoft Windows Recovery Console" appears on the startup menu.
Alternatively, you can use a Universal Naming Convention (UNC)-established connection to install the Recovery Console from a network share point.
Recovery Console rules
Several environment rules are in effect while you are working in the Recovery Console. Type set to see the current environment. By default, these are the rules:
• AllowAllPaths = FALSE prevents access to directories and subdirectories outside the system installation that you selected when you entered the Recovery Console.
• AllowRemovableMedia = FALSE prevents access to removable media as a target for copied files.
• AllowWildCards = FALSE prevents wildcard support for commands such as copy and del.
• NoCopyPrompt = FALSE means that you are prompted by the Recovery Console for confirmation when overwriting an existing file.
Alternatively you can download the Recovery console patch /software from these urls :
http://www.4shared.com/file/QF0GVQuD/recovery_console.html
http://www.4shared.com/file/yIK-5g8F/xp_recovery_console.html
OR THE VIDEO , HOW TO INSTALL THE RECOVERY CONSOLE :
http://www.4shared.com/file/QrC9STRm/rc_online.html
How to delete the Recovery Console
To delete the Recovery Console:
1. Go to My Computer, and then double-click the root drive where you installed the Recovery Console.
2. On the Tools menu, click Folder Options, and then click the View tab.
3. Click Show hidden files and folders, click to clear the Hide protected operating system files check box, and then click OK.
4. At the root folder, delete the Cmdcons folder and the Cmldr file.
5. At the root folder, right-click the Boot.ini file, and then click Properties.
6. Click to clear the Read-only check box, and then click OK.
Warning: Modifying the Boot.ini file incorrectly may prevent your computer from restarting. Make sure that you delete only the entry for the Recovery Console. Also, change the attribute for the Boot.ini file back to a read-only state after you finish this procedure. Open the Boot.ini file in Microsoft Windows Notepad, and remove the entry for the Recovery Console. It looks similar to this:
C:\cmdcons\bootsect.dat="Microsoft Windows Recovery Console" /cmdcons
0 comments: